Welcome to Part 2 of the Dynamics 365 Finance and Operations Security Management (D365 F&O) blog evolving around the implementation phase of establishing a data security system. The previous blog gave an overview of the security architecture in D365 F&O and emphasized the importance of robust security measures to protect sensitive data and defend against cyber threats. Now, we will dive deeper into the implementation and execution of security management in D365 F&O.
In this comprehensive guide, we will walk you through the step-by-step process of effectively configuring and optimizing security settings within your D365 F&O environment. With a well-designed security framework in place, your organization will ensure that all users have the appropriate access rights and permissions to perform their job functions while mitigating the risk of unauthorized access and potential data breaches.
1. Implement and Configure Security in F&O
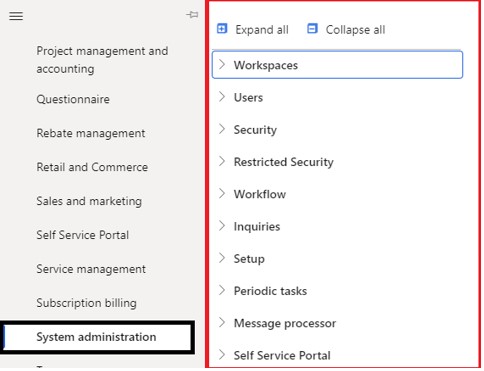
To access the security configuration, you must navigate to the system administration module.
![]()
Upon opening the module, you will discover various tabs that cover the key points we have discussed.
1.1 Assign a User to a Security Role
In this first blog, we will configure the basic level security parameters before going into the advanced level. It begins with assigning a user to a role.
Note* D365 Finance and Operations: In role base security, a user is assigned to role. To proceed with the functionality, follow the following steps.
Step 1: Navigation to the module
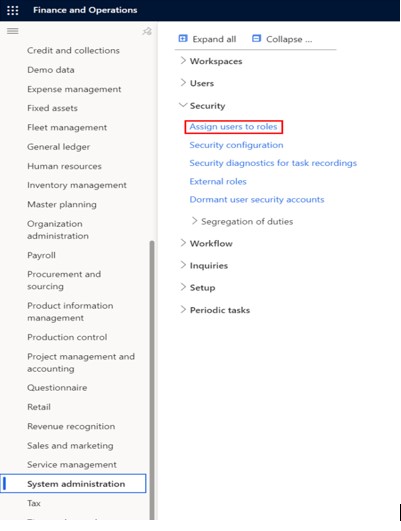
To navigate the module, go to the
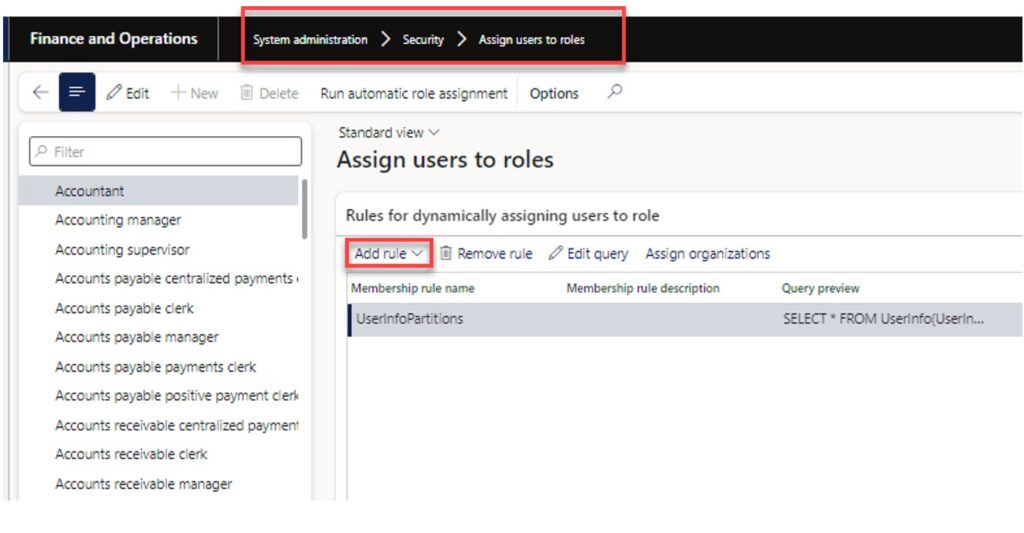
System administration > Security > Assign users to role
Step 2: Select the Role and Assign to the User
Click on assign users to roles and you will have this page.
Under this page, you can navigate to the desired security role name. For instance, “ACCOUNTANT.”
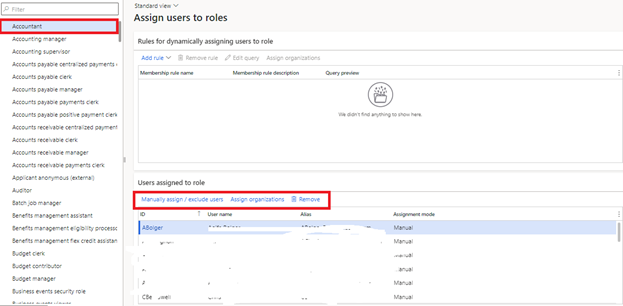
Now, select the button Manually assign to assign a user to the role.
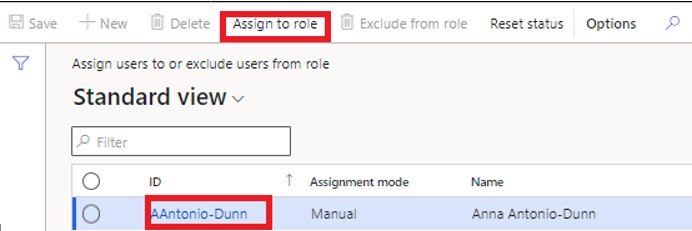
This will open a user selection form. Here you can click on the user you want to associate with the security role and click the “Assign to role” button.
Select the user ID and click on the header fast tab Assign to role.
Step 3: Assign Organization
In certain cases, you may want to limit users to certain legal entities. In this example, I want to limit this user to only having security access to the “USMF” company.
To do this click the “Assign organizations” button.
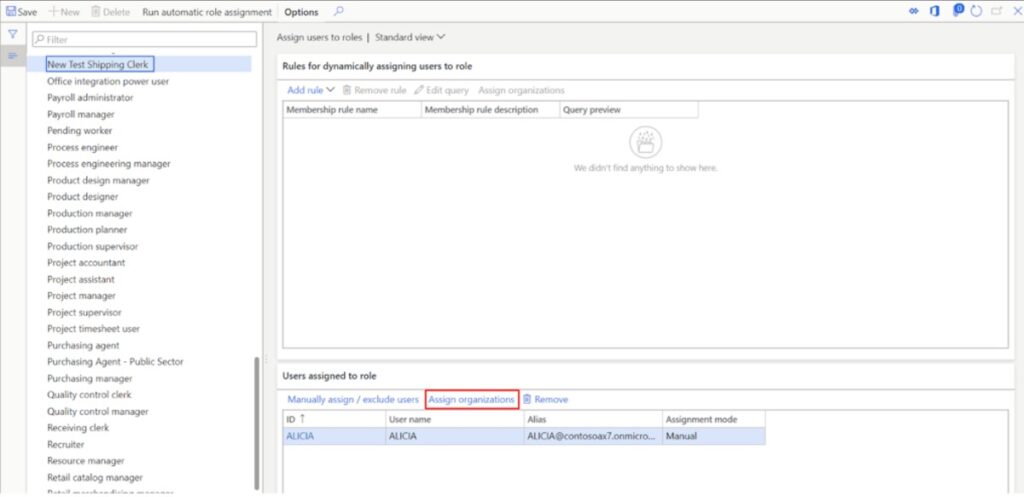
Click the “Grant access to specific organizations” option.
Click the legal entity you want to grant access to and scroll down to the bottom of the page.

Click the “Grant” button and you will see the legal entity you selected brought into the grid.

So, now the user will have access to the legal entity to which he has been granted access.
1. Custom Security Role
Suppose you have a new member on board, and as a senior manager, you want to allocate certain roles to that user to complete a certain task. By default, predefined roles are allocated whenever a new user is created. But this time, you want to edit those roles and duties. Here is how to do that:
- To create a new security role, navigate to System Administration> Security > Security Configuration.
- Click the Create new button.
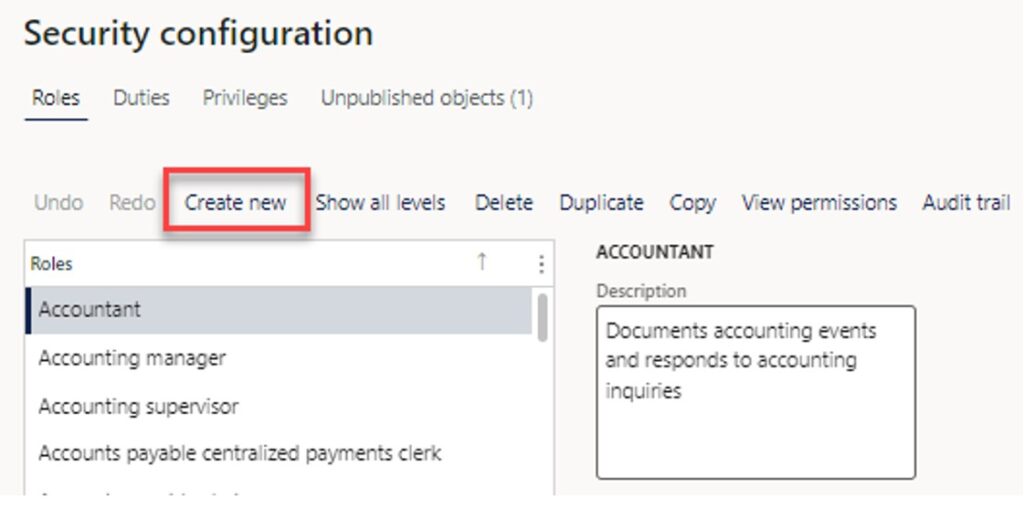
Now, Enter the new role name, for example, Shipping Clerk.

2.1 Assign A Duty to A Security Role
There are two sub-levels of security. We can assign only duty with privileges or end-level-only privileges.
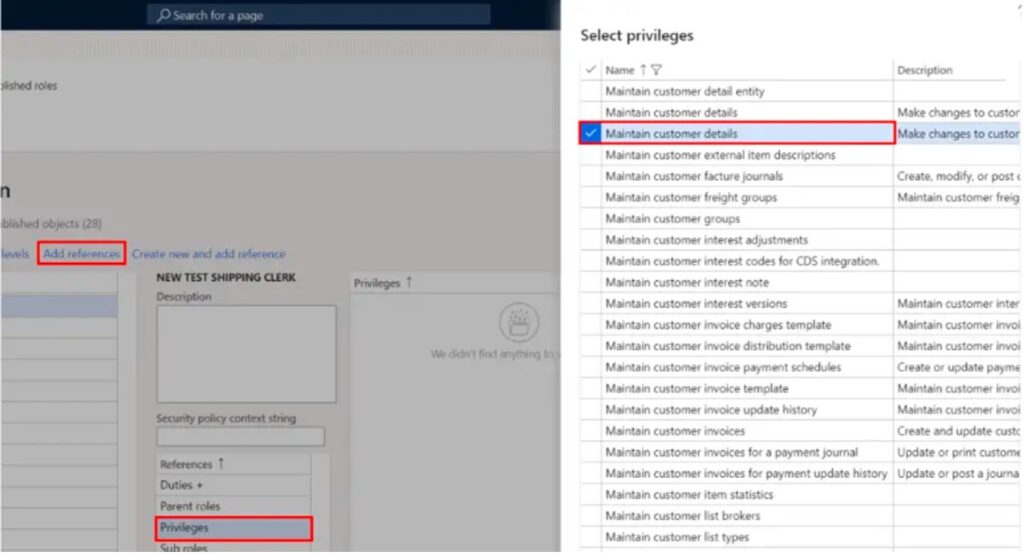
To assign a new duty, click the role we just created (Shipping Clerk) and click on the Add Reference button.
- To add a duty, find the security role you just created (Shipping Clerk). Click on it and Select the Duties reference in the middle of the form.
- Click the Add References button.
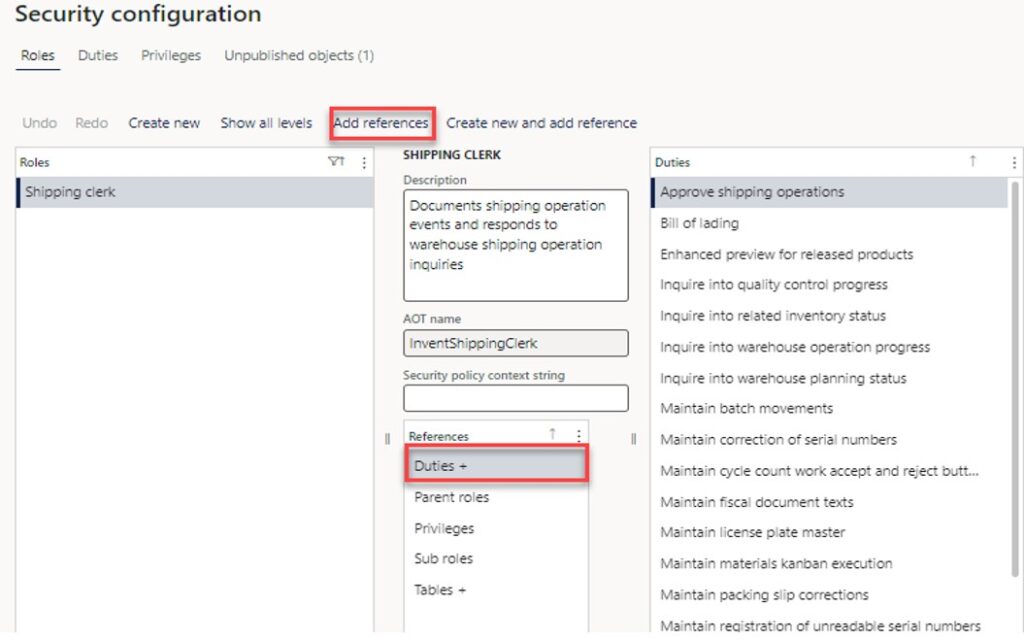
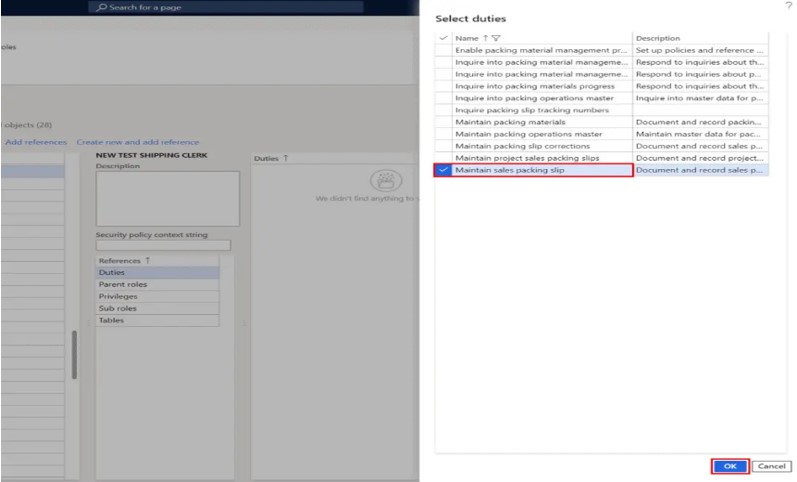
- This will open the Duty Selection Select the duty you want to add and click the Ok button.
2.2 Assign a Privilege to a Duty
You can add specific privileges to your duty by clicking the Privileges reference in the middle of the form. Then click the Add References button again to open the Privilege pane. Select the privilege that you want to add and click the Ok button.
Moreover, if you want to know which duties or privileges you need to assign, here is what to do:
Extract all the roles, duties, and privileges to Excel, and search the Excel sheet for the duties and privileges you need. This proves to be a very good way to search for privileges you need and what privileges are assigned to what duties, all in one view.
Use the Security Diagnostic for Task Recording feature to determine which security roles, duties, and privileges pertain to your business process. Later in the article I will go through how to use this tool.
2.3 Publish Objects
Now that we have created the security role, assigned a duty, and assigned privileges to the duty, we are not quite ready to assign that security role to the user. First, we need to publish our new security role.
To publish our security role, click the Unpublished Objects tab.
Find the security role we created, select it, and click Publish.
Now it will show up as available to be assigned to a user.
1. Dynamically Assign Users to Security Roles
Users can set up rules for automatic role assignment to guarantee that role membership is based on current business data. If you use automatic role assignment, permissions are automatically updated when people change jobs in an organization.
In the security role assignment form, there is an option to dynamically assign users to roles. This option allows you to build a query associated with the security role that will look for users to assign based on user-defined filter criteria. This can offload much of the heavy lifting involved with assigning security roles to users. Also, it saves you from the tedious task of manually assigning security roles to the users.
To use the automatic role assignment, click the “Add rule” button.
In the drop-down arrow, select the query that looks most relevant. In this example, I am going to use a query that is based on user data.
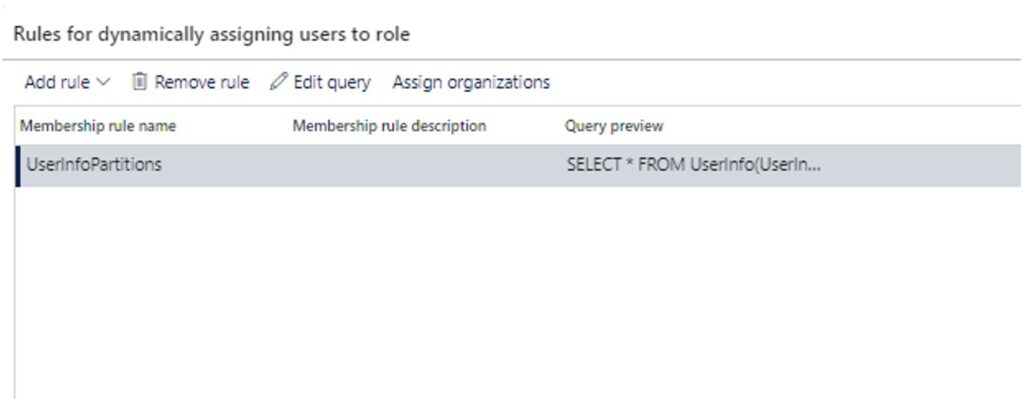
Now, I have added my rule, and I will click on the Query Editor to define certain parameters. Let’s suppose I want to use it on an email basis.
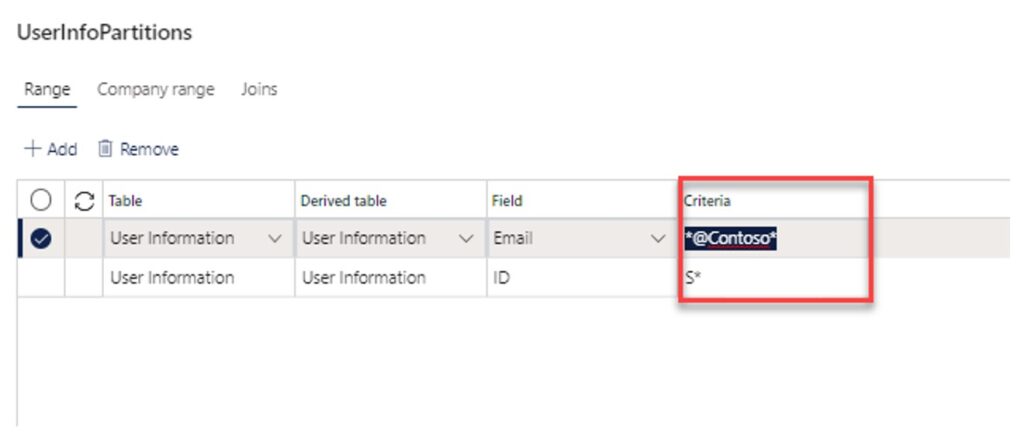
This will open a query form. Here I can define that I want to assign this role to all users with a user ID that starts with the letter “S” and has an email that contains “@contoso”.
To run the automatic security role assignment based on the query click the “Run automatic role assignment” button.
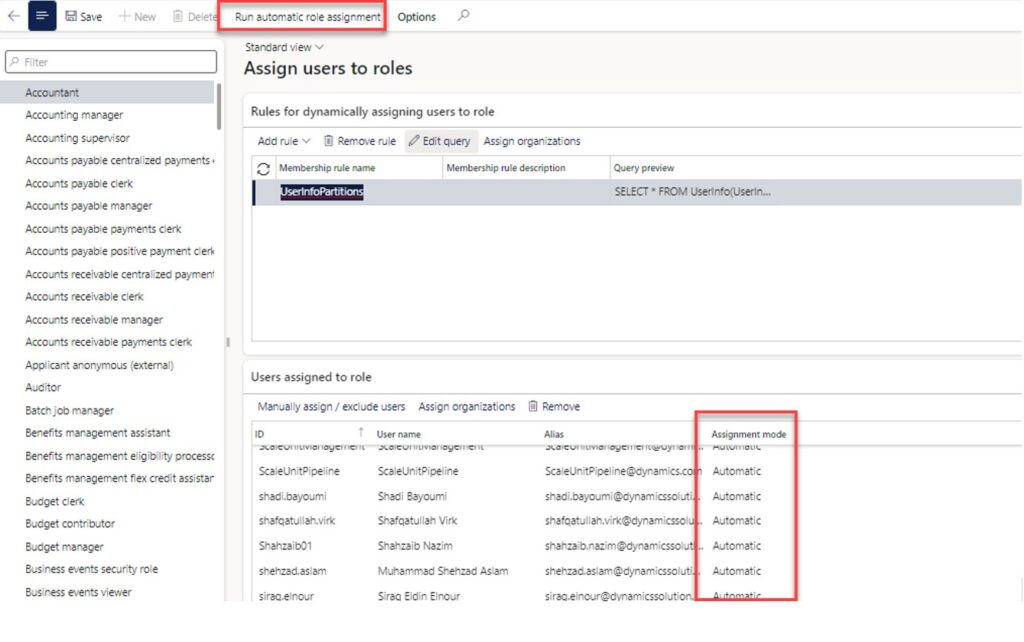
Down in the “Assign users to roles” section, you will see all the users that met the query parameters and were automatically assigned to the security role. You can identify the automatic assignment by looking at the “Assignment mode” field. Automatically assigned users will be set to “Automatic” and manually assigned users will be set to “Manual”.
Security Diagnostic for Task Recordings
The security diagnostic tool for task recordings is a powerful tool to help security administrators figure out which security roles, duties, or privileges are required to complete a business process. The security diagnostic tool works by analyzing a task recording file to determine if security permissions are missing for a given user and then displays a list of security objects that would grant the necessary permissions to complete the business process.
For this example, I have already created a task recording of creating a vendor record.
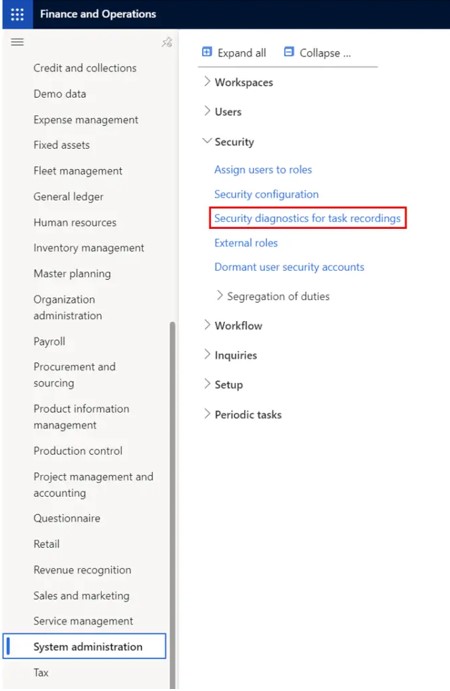
To use the security diagnostic tool for task recordings, navigate to System Administration> Security > Security Diagnostic for Task Recordings.
Click the “Open form this PC” button.
This will open the file chooser on your computer where you can select a task recorder .axtr file. Click “Close”.
In the “User ID” field select the user ID where you need to verify their security permissions to the task recorded on the task recorder.
In the “Missing permissions” field you will see a “Yes” if the user is missing permissions to parts of the task.
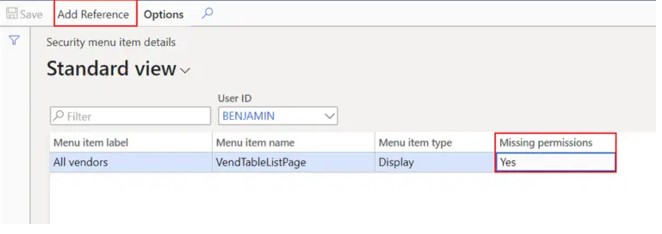
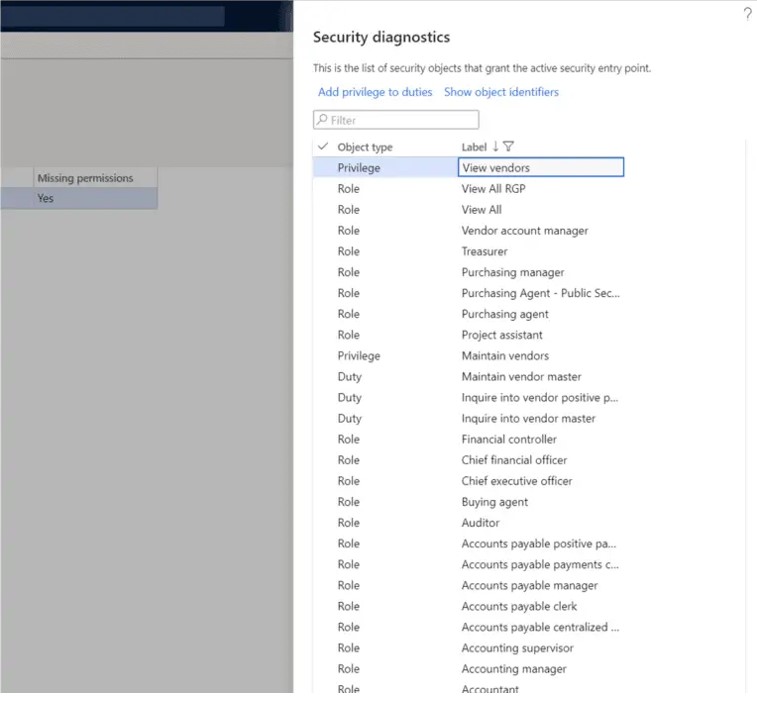
Click the “Add reference” button. This will show you a list of security roles, duties, and privileges that have the required permissions. From here you can add the security role, duty, or privilege to the user.
 Dynamics Solution and Technology – Your Trusted D365 Implementation Partner!
Security is an extremely important and often overlooked aspect of ERP implementations which leads to problems later in the project. Starting security early and getting security roles assigned and tested is key to a successful implementation.
The security framework in Dynamics 365 Finance and Operations is very flexible and although intimidating at first, it is very easy to use after you get the hang of it. Nevertheless, implementing effective security management practices is crucial for any business, and using Microsoft Dynamics 365 can be a game changer in achieving that goal. By leveraging the capabilities of finance features, businesses can not only comply with regulations and industry standards but also gain a competitive advantage by demonstrating their commitment to security and trustworthiness to customers and partners.
Along the implementation process, it is natural for a business to ensure seamless migration to the D365 platform. Dynamics Solution and Technology provides a comprehensive implementation stream to ensure the long-term success and sustainability of your business needs. With years of experience in developing business solutions to combat the worst challenges, our team of experts embeds solutions to guard your businesses against data breaches.
It’s time to strengthen your business against data breaches. Connect today!


