
Organizations continue to struggle with financial complexities, amidst rising competition and economic uncertainty. The urge to meet every financial year’s targets while ensuring transparency, reliability, and swift financial reporting may become challenging.
Nevertheless, Microsoft Dynamics 365 Business Central, with its foundations in ERP solutions, unifies the financial and business operations across all facets of the organizations. The intelligent, modern, real-time user interface allows for managing the modern enterprise at a global level.
This blog gives a breakthrough into some of the most essential finance features of Microsoft Dynamics 365 for Business Central that are most likely to optimize the user experience of business users.
Block Deletion of the G/L Accounts feature!
Companies evolve, and so do the financial needs that grow along. After some time, owing to these changes, it becomes essential to modify the Chart of Accounts. It may require the financial team to delete one or more accounts. However, you must balance the account to zero and close the fiscal year to prevent new entries from being added.
Block Deletion of G/L Accounts feature provides additional protection to your Chart of Accounts to avoid accidental deletion.
To initiate the Block Deletion of G/L Accounts feature, go to the General Ledger Setup page, and look for Check G/L Acc. Deletion After field. Specify the start date of the period your country requires you to store financial data and turn on the toggle for the Block Deletion of G/L Accounts.
Nevertheless, there may come a time when you need to delete those accounts. Turn off the Block Deletion of G/L Accounts toggle, and you’re good to go. So, say goodbye to the stress of accidental deletions and hello to peace of mind with Microsoft’s Block Deletion of G/L Accounts feature!
Consolidating Customer and Vendor balances
If you’re doing business with a company that’s both a customer and a vendor, you can streamline your financial transactions and save money. By consolidating the balances between you and the company, you can avoid making unnecessary payments or receipts and reduce transaction fees. It’s a win-win situation that makes financial management more efficient and cost-effective.
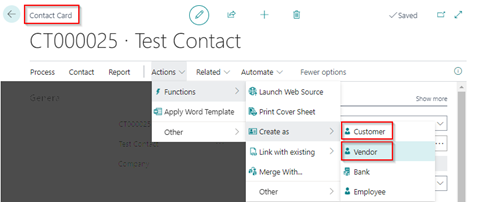
Customer/vendor Creation from Contact Card
Vendors.
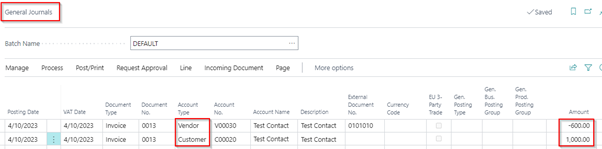
After that, we will post a Journal entry. In a hypothetical scenario, we have purchased $600 of goods from this vendor. Later, we sold $1000 worth of more refined goods to this same vendor. Now this vendor is also our customer.
We input this data and click on Post/ Print and Post.
After that, on the customer card, we can see the balance of the customers, as well as the balance of vendors, as shown above.
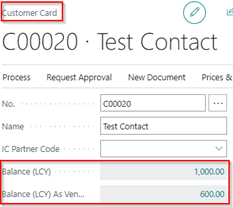
Figure 1 “The value shown in these fields is the same as the amount present in the general journal line level. Right now, these are 2 separate balances, but d365 Business Central can help you to net off both the values.”
Now go to the payment journal, and there is an option for Net Customer/ Vendor Balances in the Prepare field. Click on it, and a new window will open. Specify the criteria in it. This includes document numbers, specifying the vendor, etc. Specify the criteria according to each requirement, then click OK. After this, two lines will be created in the payment journal. Once done, post the journal. As a result, the balance will be netted off, as shown below:
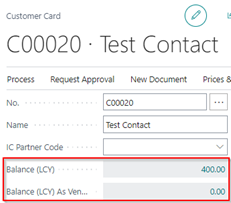
Figure 2“Now you can see that we are no longer liable to the vendor. The value is already net off, and the remaining balance of $400 is showing in here.”
Deferrals in Business Centrals
Deferral templates in Business Central allow you to defer revenue or expense recognition over a specific period automatically. This feature is handy for businesses that need to recognize revenue or expenses over a more extended period, such as subscription-based businesses.
To initiate, search the Deferral Template in the global search of Business Central. Click on New, and a new window will appear.
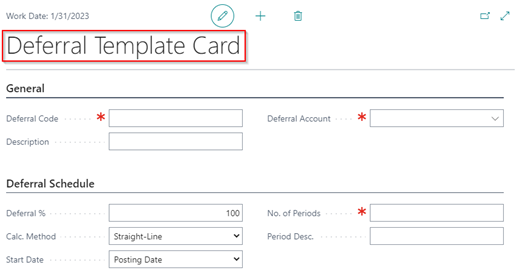
To set up a deferral template in Business Central, you will need to define the following:
- Deferral Code: This is a unique code that identifies the deferral template.
- Deferral Description: A brief description of the deferral template.
- Deferral Account: Specify the deferral account here.
- Deferral Percentage: This is the percentage on which the deferral will be calculated, such as the percentage of the total amount.
- Deferral Period: The period over which the revenue or expense should be deferred.
- Calculation Method: Four different methods are present in the Deferral Template’s deferral.
- Straight Line: This method distributes the deferral amount evenly over the deferral period.
For example, if you have a $1,200 deferral that needs to be recognized over a period of 12 months, and the start of the period is from the 15th of the month, then according to the straight-line method will recognize $100 of revenue or expense each month. But for the first and last month, in which the days are 15, the deferral amount will be $50.
- Equal Per Period: In this method, the deferral amount depends on the period, not on days. If we use to solve the previous example by using this method, then the equal per-period methodwill recognize $100 of revenue or expense each month. It will not affect the value if the first month is considered for 15 days only.
- Days Per Period: It calculates the total amount per day, multiplies it by the number of days of every month, and considers the value of the period.
- User Defined: In this, the system has nothing to do with calculation. The user will define the value on its own.
- Period Description: Specify the description of the period.
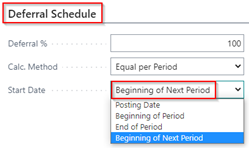
- Start Date: We can specify the start date of the calculation.
- Posting Date: Start from the Posting Date.
- Beginning of Period: Start from the beginning of the period.
- End of Period: Start from the end of the period.
- Beginning of the Next Period: Start from the beginning of the next period.
Once you have set up the deferral template, you can apply it to specific transactions in Business Central. When you apply a deferral template to a transaction, the system automatically calculates the deferred amount and creates the necessary accounting entries.
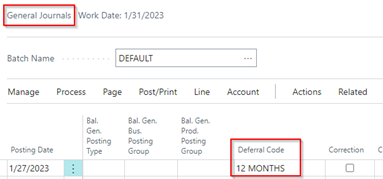
To initiate, go to the General Journal module, and a new window will appear. It shows a field of Deferral Code. In this field, we will specify the deferral template.
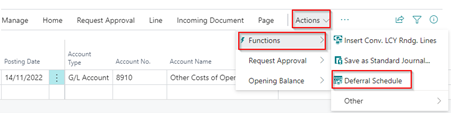
Once every field is specified in the General Journal we need to check the deferral schedule. Go to the Actions tab > Functions and select the Deferral Schedule.
If you want to edit anything, you will specify it here and then adjust it as shown below.

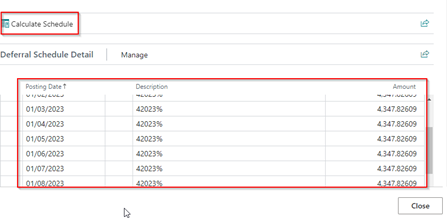
To view the complete Deferral Schedule Detail, click on Calculate Schedule.
Beginning of the Next Period
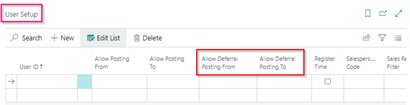
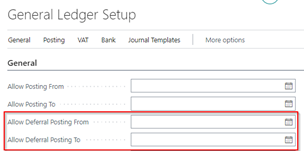
You can set up specific time periods on the General Ledger Setup page and User Setup page, during which people are allowed to post deferrals for specific users. This is done by entering dates in the Allow Deferral Posting From and Allow Deferral Posting To fields. Even if other entries are blocked during this time, users can still post deferral entries for a future period.
In deferral templates, you can choose the Beginning of Next Calendar Year as the starting date. This makes it easier to set up deferrals scheduled to start at the beginning of the upcoming year.
Change Log Setup
Microsoft Dynamics 365 Business Central users can keep track of changes made to data in the system using the Change Log Setup feature. As a result, it is possible to track and audit any changes or deletions made to existing records as well as the creation of new ones.
Once configured, the Change Log Configuration will keep track changes made to specific tables and their fields. In addition to the old and new values of the modified fields, this information may include the name of the user who made the change, the date and time of the change, and the type of change (insert, modification, or deletion).
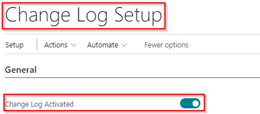
If you want to work on the Change Log Setup, search it in the search bar and enable the toggle of Change Log Activated.
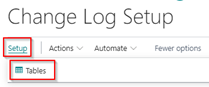
One thing to remember regarding enabling Change Log Setup is that we need to select all the modules we want to select for the Audit trial. It is better to select the required tables rather than enabling all points. This is because your system will be overburdened with stuff you do not want to keep track of. For that, go to Set-up and then select Tables.
When you click on the table, a new window will open, showcasing several options.
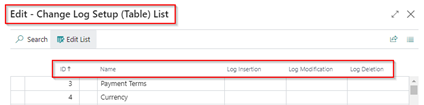
ID: The ID of the Table.
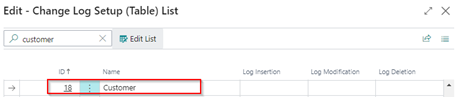
Name: The name of the table for which we want the Log.
Log Insertion: If we enable it in the customer table, then whenever we enter a new customer master, it will create a new Log entry.
Log Modification: If we enable it in the customer table, then whenever we modify a customer master, it will modify that Log entry.
Log Deletion: If we enable it in the customer table, then whenever we delete a customer master it will delete that Log entry.
There are two further options present in every Log Insertion, Log Modification, and Log Deletion, as shown below:

Some Fields allow you to manually select the field of the customer on which the Log entry will be made. All Fields allow you to select the fields automatically.
To select the fields manually, click on Some Fields.

- Select the required fields of the customer master and then mark the log insertion, modification, and deletion (depending on your requirements).
- Log Modification: The same description is for the log modification.
- Log Deletion: The same description is for the log deletion.
- After that, you can check the entries from the Change log Entries.

Retention Policy
In the Change Log Setup > Actions > Setup > Retention Policy. It opens a new window.
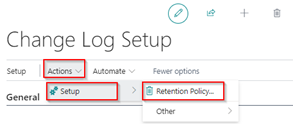
This is a section of the Retention policy, and some options are present in it.
- Retention Period: Specify periods for which you want to keep data in the tables in a policy. The periods determine how often data will be deleted.
- In the Table ID field, choose the table you want to include in the policy.
- Optional: To apply the policy to specific data in a table, turn off the Apply to all records The Record Retention Policy Fast Tab will be displayed, where you can set filters to create subsets of data for each line.

How to Set a Different Bank Account as the Default for Sales Documents?
In the Bank Account Card, Business Central provides a feature name “Use as Default for Currency”. Now you can easily set the default bank accounts for your company and individual currencies.

When creating a sales document, the default bank account is automatically assigned based on the currency specified in the Company Bank Account Code field. This selected bank account is copied to the Company Bank Account Code field on posted documents.
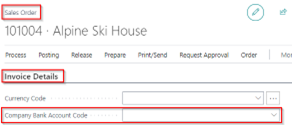
Once you have posted the document, the fields are not allowed to change. However, Microsoft Dynamics 365 – Business Central permits users with the appropriate permissions to change the default bank account by selecting a different account in the Company Bank Account Code field. The designated bank account details are also included in printed documents.
To open the window (on which you want to update the posted sales invoice document), go to Process, and click on the Update Document.
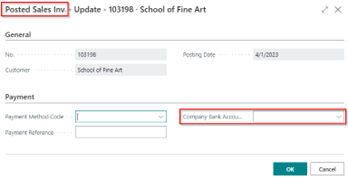
The Payment section of the Update Posted sales invoice has an option for a Company Bank Account. In this field, you can change the bank
account even if the document is Posted.
Initiate Implementation Phase with Dynamics Solution and Technology
Microsoft Dynamics 365 for Business Central remains a complete and holistic solution for all your financial business needs. From monitoring your global financial operations in real-time, predicting outcomes, and making data-driven decisions that drive business agility and growth, it is the one for you.
Migrating to the D365 Business Central requires expertise in seamlessly integrating your business into this new model. Arising complexities, embedding change, and ensuring swift transition may slow down your processes. With the skilled expertise of our team, Dynamics Solution and Technology promises safe and reliable implementation processes.
Being a Microsoft Gold Partner, we excel in implementing its solution into your business infrastructure for an accelerated digital transformation. Are you ready to experience it? Connect today and get started!


 United Kingdom
 Saudi Arabia
 UAE
UAE Pakistan
 India
India Malaysia