The last decades have witnessed monumental disruptions. Handling complex personalization, building foolproof ERP integrations, aligning technology with strategy, and calculating holistic ROI are common B2B challenges faced by numerous businesses. Technology became inclusive and has penetrated the marketplace to establish a network of digital logistics and infrastructure to simplify business operations and add value.
Businesses operating in the global e-procurement market continue to invest in research and development activities to constitute new and innovative techniques. The first dedicated e-procurement system was initiated to communicate transaction communication instantly.
Today, innovation has fast-tracked. With the improved workflow and streamlined productivity, users have direct access to inventory management, procurement, and MRO (Management, Repair, and Operations) in a single, comprehensive system.
Punchout | A New Horizon for B2B Clients
Online shopping has disrupted the consumer retail industry and is becoming more common for B2B transactions to take place in a similar setting. eProcurement software services have changed the way that businesses handle their indirect spending. As a result, companies need to adapt to the market to remain relevant and competitive.
eProcurement services allow buying organizations to manage their spending easier, select preferred vendors, and simplify the buying process. The benefits of eProcurement for the buying organization are plentiful and encapsulate the supplier needs too. Moreover, suppliers can become preferred suppliers. However, to be the buying organization’s preferred supplier, you will need to integrate with their eProcurement system.
That’s where Punchout Catalogs come into the picture.
Punchout Catalogs enable buyers to temporarily leave their eProcurement system to shop a supplier catalog on the supplier’s website. A Punchout connection will facilitate the transfer of the buyer credentials into the supplier site and then return the catalog items back to the eProcurement system to complete the checkout process.
Why Do Businesses Need Punchout Catalogs?
Punchout catalogs provide convenience and versatility for the buyer’s procurement process. Together, with distinctive communication and collaboration channels, it improves efficiency and adds flexibility.
Some quick and effective reasons why businesses are increasingly resorting towards Punchout Catalog are shared below:
Reduced Maintenance Levels
Punchout is built on a promise of cost-effectiveness. It means there are no cost factors associated with the upkeep or publishing. Automatic updates and additional discounts are automatic and eliminate the need to do it manually. Along with that, it also significantly reduces any possibility of incurring errors.
Expense Management
Offering a seamless manner of generating purchase orders and covering multiple levels of approval within the firm, adds automation to the process. This directly relates to financial reporting in reducing the probability of committing financial errors.
Increased Productivity Levels
PunchOut Catalogs makes the process smooth, yet simple. The interface guides the customers to make their purchase, add it to the basket, and complete the purchase. A swift purchase cycle resonates in the company’s productivity levels.
Real-time Inventory Management
The buyer’s PunchOut catalog showcases accurate product information and is available in real time. Making one small edit automatically updates the catalog in real-time.
On the other hand, the seller simply must manage one catalog for all B2B buyers, as the prices and product update auto-sync to multiple PunchOut catalogs based on the rules for negotiated prices and discounts set.
The inclusion of real-time inventory management allows businesses to automate their operations. They no longer must wait for long hours just to send their purchase orders to their vendors. Using the login credentials, the user can log in anytime and complete the procurement tasks anywhere.
How Does PunchOut Work for the Buyer and the Seller?
A growing number of businesses have moved to eProcurement software services by initiating Punchout integration. This integration process begins from the buyer’s side. In response, the seller lists out the PunchOut requirements, enabling the digital procurement catalog and integrating it with the buyer’s e-procurement system.
B2B Punchout Catalog offers a range of options for reaching out to entities, while digitally generating the buyer’s purchasing application. From connecting the supplier’s online store catalog directly with the e-procurement systems, PunchOut Catalog allows customers to continue with the conventional B2B interactions.
It begins with the Punchout Setup Request (PSR)
The customer initiates the purchase journey by opening their e-procurement platform and looking for the supplier. Once they make their pick and open the supplier’s landing page, the e-procurement platform directs the user to the supplier’s e-commerce store or B2B marketplace.
At this point, the system automatically authenticates the buyer and logs him into their account in the supplier’s online store. On the back end, the punchout connection starts up, and the data about the supplier is directly transferred to the catalog. This quick procedure is known as the PunchOut Setup Request (PSR) and is listed in XML. After this, the online buyer is directed to the supplier’s catalog to browse for their desired products, viewing the product descriptions, prices, and subsets along the way.
Response from the Shopping Cart
Once the punchout connection is established, the online user can browse and make final purchases and move them off to their carts in their e-procurement carts. After adding all the products to the shopping cart, instead of checking out, the buyer is punching out. It means that the system automatically exports the order data to the buyer’s e-procurement platform for approval.
PunchOut transforms the shopping cart data into XML format and maps the data to the customer’s requirements while the catalog is running in the background.
Auto-generated Purchase Order
The buyer’s system submits the purchase order and initiates the fulfillment process of the supplier. The shopping cart processes the order using the management and budget information and finally approves the purchase. The inclusion of the PunchOut catalog adds smoothness to the process and digitally receives the order.
Finalizing the Shipment
PunchOut catalog transforms the Advanced Shipment Notice (ASN) into cXML format and sends it to the customer’s registered email address and phone number, like a contemporary procedure for product delivery.

Why do Punchout Catalogs Matter?
The waves of digitization are penetrating the globe at a phenomenal rate. The B2B purchasing processes continue to digitize and savvy buyers prefer eCommerce solutions that seamlessly integrate with their e-procurement management systems.
With the ever-competitive markets, suppliers look for unique solutions, yet market competitive to attract new businesses and retail existing customers for a seamless user experience. Punchout catalogs are a breakthrough in eProcurement integration and automation to support this level of experience and competitive advantage.
Join the PunchOut Catalog Bandwagon
PunchOut Catalog can create purchase requisitions in Microsoft Dynamics 365 Finance and Operations by “punching-out” to a supplier’s website, shopping for products using their interface, and exporting their shopping cart back into Dynamics 365.
The ‘External Catalog’ button appears on the purchase requisition and connects to the supplier using a cXML message.
Follow the steps below to get started with the prerequisites before the integration of Punchouts with the e-procurement platforms.
Prerequisite 1: Set up a Procurement Category Hierarchy
- In the Navigation pane, go to Modules > Procurement and Sourcing > Setup > Policies > Purchasing Policies.
- Click the link on the ‘Procurement Policy USMF‘ policy. This is the policy that you’ll add a rule. It must be an Active policy.
The procurement Category Hierarchy sets out the rules for ordering products in a category. Defined by certain purchasing policies, it controls what categories an employee can have access to as they create a requisition. Later, it is used to define product attributes that are associated with each category node which enables the selection of attribute values on the product setup.
Pre-requisite 2: Register the Vendor
The next step is to set up configurations to access an external vendor’s catalog to access procurement information. To add new vendor contacts, the user must navigate to Vendor Collaboration > Contacts > All Contacts page and click New. Enter the details of the new contact person, choose the legal entity they represent, and click Create.
Note: Make sure that the units of measure and the currency that the vendor uses are set up.
The vendor tab showcases the vendor record for the supplier:
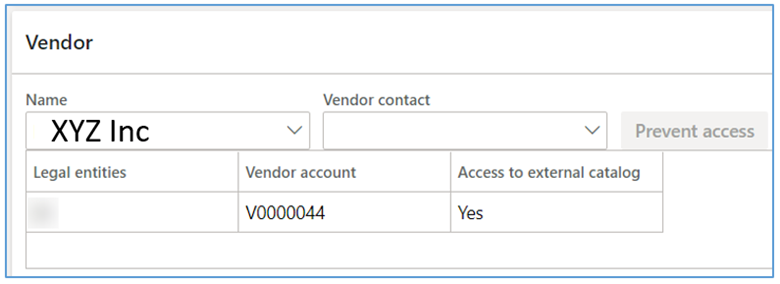
Next up, the user links the vendor to the category. By linking the vendor record with the procurement category, the inventory records stay updated in real-time.
This is done from the Vendor tab found in Procurement and Sourcing > Procurement categories, shown below.

Prerequisite 3: Configure the External Vendor Catalog
To create external catalogs, select Procurement and Sourcing> Catalogs > External catalog. The external catalog’s vendor (name and description) must also be added to the selected procurement category.
The name that you enter will appear on the cart that represents the external catalog as shown to the employees to begin requisition. Employees can click on the cart to open the catalog on the vendor’s external catalog site.
Activate Catalog
The External Catalog showcased the Activate Catalog button to initiate activation. This button should be turned on before the customers begin using it. The option to inactivate it in any scenario remains open.
Delete an External Catalog
The external vendor catalog cannot be deleted. Instead, the status of the external vendor catalog can be changed to inactive. This eliminates the external vendor’s catalog site to become inaccessible, yet it remains present there.
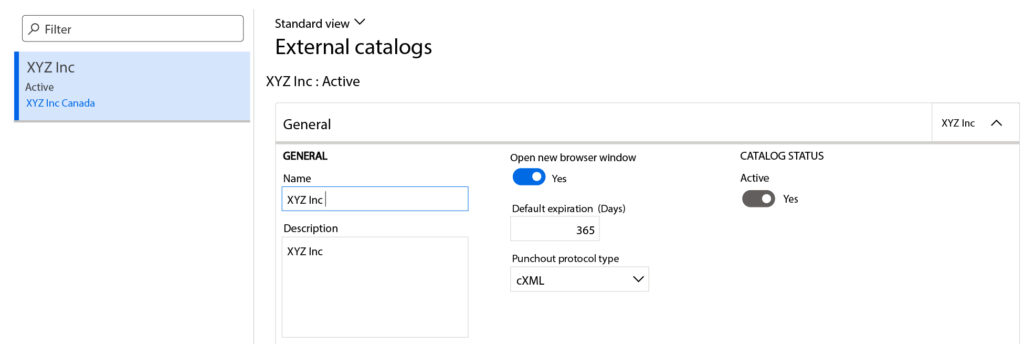
The user can also add an image via the External Catalog Image action. This appears on the cart and the employees can see it as they create a requisition. For an accurate display of the image, make sure that the dimensions of the image are accurate for perfect display.
The user can also choose to Open New Browser Window by clicking on Yes. This implies that the requisition will open in the same browser window or a new one.
In the Default Expiration (Days) field, the user is required to enter the number of days that a quotation received from the external catalog is valid and can be used to purchase from the external vendor. The above screenshot reads 365 days i.e. after creating and retrieving from the vendor’s external catalog site, the quotation is valid till the 365th day.
Lastly, select cXML format as the PunchOut protocol type.
Once the process completes, the items are brought back into Dynamics 365, and the user is directed to purchase the Procurement Category Mapping tab, shown below.
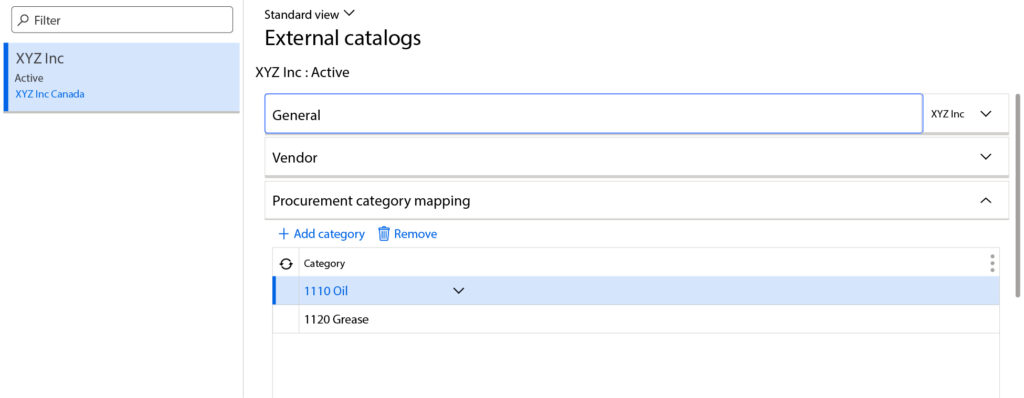
Click the Add button to start mapping the procurement categories to the external catalog. Then, in the Category name list, select a category. The procurement categories list out the ones that the vendor (XYZ Inc) had initially associated in step 1.
Note: The list of categories is a superset of procurement categories that the vendor has been mapped to in all the legal entities that are set up for the vendor.
Prerequisite 4: Initiating the cXML Format
Set up the PunchOut Protocol Type to cXML. This is an automatically generated message format is the minimal template that is required to start a session. Fill in values for the tags.
The cXML setup request will be populated with a script that looks like this:
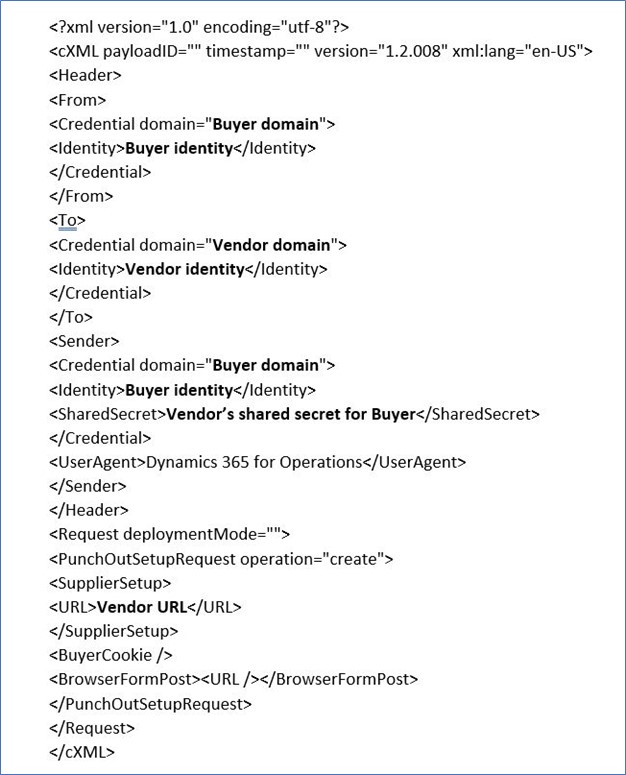
Within the Message Format, certain words are added in bold. These showcase the description of the location where the information with be added within the cXML message. The template below describes the tags that are included in the cXML setup message.
| Field | Description |
| < Header >< From >< Credential domain=”” > | The domain of the buyer’s company. |
| < Header >< From >< Credential>< Identity >< /Identity > | The identity of the buyer’s company. |
| < Header >< To >< Credential domain=”” > | The domain of the vendor’s company. |
| < Header >< To >< Credential>< Identity >< /Identity> | The identity of the vendor’s company. |
| < Header >< Sender >< Credential domain=”” > | The domain of the buyer’s company. |
| < Header >< Sender >< Credential >< Identity >< /Identity> | The identity of the buyer’s company. |
| < Header >< Sender >< Credential >< SharedSecret >< /SharedSecret > | The shared secret for the buyer’s company. |
| < Request deploymentMode=”” > | The test or production deployment. |
| < Request >< PunchOutSetupRequest >< SupplierSetup >< URL >< /URL> | The URL of the vendor’s PunchOut endpoint. |
Prerequisite 5: TESTING
The testing phase validates the catalog to figure out to verify that all the settings are correct, and you can access the vendor’s external catalog. It also checks the format of the cXML message, to ensure it is correct and runs seamlessly.
Validate settings button is placed at the top of the screen, which takes the user to the online store. This message should cause the vendor’s external catalog site to open in a browser window.
Note: During the validation process, the user cannot order items and services from the vendor.
To order items and services, the products must be selected from the vendor’s catalog via purchase acquisition.
Process of Creating External Catalogs (via Purchase Requisition Lines)
Once you can open the online store using the Validate Settings button, you can proceed to create purchase requisitions.
- Create requisition: Go to Procurement and Sourcing > Purchase Requisitions > All Purchase Requisitions and click New. Enter a name and click OK.
- Punchout: In the Purchase Requisition Lines section, click External Catalogs

The external catalogs menu pops up and lets the user choose from a range of vendors’ catalogs to punch out. Upon selecting it, the user is directed to that specific vendor’s online store.
Note: There may be instances when the External Catalog button may not be visible to you on the requisition. For that, the user can add the Employee security role to their user. Here is how it works:
- Shop: Browse the vendor site and add things to your cart. Checkout and you will be brought back into D365.
- Choose a category: Once back in D365, a Validate Shopping Cart form will come up. For each line item, choose a Procurement Category from the list of categories added in the Procurement Category Mapping in setup. Click Add to Requisition and the lines will appear in the Purchase Requisition Lines.
Rolling Out the Punchouts, with customizations!
Industries of the world today are increasingly moving towards a holistic, real-time, and automated system that enables businesses to seamlessly correspond between suppliers and vendors. Providing access to the vendor’s catalog directly links the e-procurement solutions, helping them work together.
Nevertheless, there continue to remain numerous loopholes in a standard service feature. However, adopting a customized approach with adds smoothness to the procurement procedures, eliciting an all-natural and subtle appearance for customers.
Dynamics Solution and Technology is all geared to deliver an exceptional level of performance to clients and to achieve that, it personalizes the standard procedure of the external catalog and improves the overall efficiency of the system.
Add Item Filter in ‘send through cXML’
For instance, the standard procedure for an external catalog includes an option of ‘send through cXML’. Typically, by selecting YES, the process becomes active. However, the experts at Dynamics Solution and Technology have added customization to it, by including two options for filter types i.e. whether the item type is a product or a service.
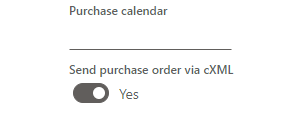
If the product selected from the procurement system is a product, the option of ‘send through cXML’ will automatically become YES. On the contrary, if the selected item is a service, so the option of ‘send through cXML’ will automatically become a NO.
The reason owing to this filter selection takes place is that punch out is available only for the item types, not the service types. Automating this step enhances workflow and saves time.
Auto-confirmation in Enterprise Asset Management (EAM)
Organizations are increasingly moving towards digital transformation by incorporating new and emerging trends and encapsulating the needs of the customers to present a tailored solution.
Dynamics Solution and Technology tailor the solution set to its clients in the procurement module of Dynamics 365. This provides a modern, connected solution for organizations that manage assets in customer locations. Once a purchase is made in the e-procurement platform, the purchase order is directly punched out from Enterprise Asset Management (EAM) before confirmation in the Procurement module.
Set up vendor purchase orders to use cXML
Every time that the user confirms a purchase order where the Send purchase order via cXML option is set to Yes, the system automatically generates the cXML message and delivers it to the vendor that is associated with that purchase order. There are two ways to control this option for your purchase orders:
- To set up a vendor so that it automatically uses cXML for all new purchase orders that are created from a requisition, go to Procurement and Sourcing > Vendors > All Vendors, and select or create a vendor to open its details page. Then, on the Purchase order defaults FastTab, set the Send purchase order via cXML option to Yes.
If you want the cXML to automatically be used for new purchase orders that are not created from a requisition, you must also set the ENABLE MANUAL PO order property to True for the related external catalog.
- For individual purchase orders, go to Procurement and Sourcing > Purchase Orders > All Purchase Orders, and select or create a purchase order to open its details page. Switch to the Headerview, and then, on the Setup FastTab, set the Send purchase order via cXML option as required.
Create and process a purchase order through cXML
When you create a purchase order for a vendor, it will inherit the setting of the Send purchase order via cXML option from that vendor. However, the setting remains available on the Setup FastTab in the Header view of the purchase order, so that you can change it later as required.
You can manually add purchase order lines or copy them from other purchase orders. Be sure to set all required fields. These required fields include the external reference number, which is the vendor number that will be used in the cXML message.
Make sure to confirm the settings after finishing filling in all the details for the purchase order. No message is sent unless the purchase order is confirmed. To confirm a purchase order, on the Action Pane, on the Purchase tab, in the Actions group, select Confirm.
After the purchase order is confirmed, you can view the status of the confirmation through the Purchase order confirmations journals. On the Action Pane, on the Purchase tab, in the Journals group, select Purchase order confirmations.
For more details and the initiation of complete setup in your procurement system, you can contact Dynamics Solution and Technology for an end-to-end deployment solution.
Integrate your Purchasing and Inventory Requirements with External Catalogs
Dynamics Solution and Technology is a Microsoft Gold Partner, committing to providing excelling deployment services under the umbrella of Microsoft Dynamics 365 suit. Our industry-leading performance showcases real-time scalability and excelling efficiency of D365 to digitally upscale your company.
The value additive personalization to the standard PunchOut Catalogs has been designed while keeping an account of the possible complexities involved in procuring a product. It operates in a robust workflow, recognizing the multiple workflows and accommodating the buyer at numerous levels of approval.
B2B transactions tend to be complex, however, the inclusion of a content management system and innovations like Punchouts, has helped the businesses equip themselves according to the needs of the businesses.
Moreover, the expertise of Dynamics Solution and Technology bears recognition in the global arena, especially in the UAE and the MENA region regarding D365 integration and deployment stages.
Experiencing such a level of agility goes beyond the usual with customized solutions for your global enterprises. Connect today!

